how to build a toy box out of plywood
Its strong and you can move this box wherever you want. Lets start by assembling the box sides of this Wooden Toy Box Build Plan.

Toy Cubby Shelf Just One Sheet Of Plywood Diy Shelves Bedroom Living Room Toy Storage Living Room Toy Storage Furniture
Take a 12x12 plywood square and determine which side will face the interior of your toy box.

. Wood Toy Box Ideas Pictures. The cover opens by lifting the lid from the front of the box. When autocomplete results are available use up and down arrows to review and enter to select.
Build a Wood Toy Box. Here are the cuts you will need to make using the 025. To add the trim follow the general rules you would use for adding trim in your house.
The toy box is made out of different types of plywood sheets with real wood edge banded to give the look of a more expensive solid wood that comes in with a much cheaper price tag. Building a toy box is a straight forward project that will help you store your kids toys. 1 inch brad nails and brad nail gun.
Use the 35mm drill to make the pilot holes and screw them stay in place. Its easier to sand at this stage. Youre marking the pocket hole placement for the side panel to attach to the legs here.
Lastly attach the lid with the hinges and. Using a tape measure and straightedge lay out the chests nine individual pieces on a half sheet of ½-inch birch veneer plywood. Add a 1cm lip to the bottom and top so that you can secure it with screws or nails.
Here are some ideas that will help you with your DIY endeavors. If youll be staining your crate youll want to carefully sand the outside of the plywood with the medium grit paper and a fine grit paper. To start I cut out the sides bottom and top of the box.
These are the handles. Touch device users explore by touch or with. The lid needs to be assembled the same way as the side frames and back and front frames except that we need to add 1x2s along all sides of the lid.
1 - Measure all your pieces and use a miter box to cut the pieces. The lid is also made of wood with metal hinges. So you have three marks till now making a triangle shape.
To start i cut out the sides bottom and top of the box. Assemble Rest of Toy Box Sides. Then make a mark on the lid.
Put 1 Kreg Jig pocket hole about 3 from each end of the 11 14 end of the 2 19 12 boards. Wipe off dust with a tack cloth or very lightly damp cloth. To make it easy and repeatable on the table saw glue and fasten these in place with Brad nails.
Reclaimed wood can be transformed into a wonderful toy storage box if you can go by the tutorial. I hope you enjoy itTOOLS AND MATERIALS - U. Once framed the front face frames on the design are laid out so that each piece can be mitered at 45 degrees.
Clamp the plywood to a worktable. View in gallery view in gallery. So thats 4 pocket holes on each board 8 total pocket holes.
The instructions and images are contained in a PDF file and are so detailed at each step that it shouldnt at all be a problem to build. Free 2-Day Shipping wAmazon Prime. Front back two sides bottom two roof sections and two gable ends using the measurements in the illustration.
Use glue and three screws from the inside. This free toy box plan from Wayne Of The Woods has a hinged lid with additional hinges on the outside of the box and suggests adding handles at the end of construction. 3 - Secure the trim with 34 finishing nails.
The base of this box is all wood. Turn the toybox upright. Build the lid of the DIY wooden toy box.
Attach front and back panels the same way using ¾ pocket holes and 1 ¼ pocket hole screws like shown. In this project I do use a variety of more expensive woodworking power tools however you can get by and make this with manual tools it will just take slightly more. This creates a 12 overhang on every side.
Install the two 1- x 3- x 13-inch boards between the corners flush with the top edge. The plans can be finished using a single piece of plywood although you will need matching edging material. At that point I added some iron-on edge banding to cover up the exposed edges of the plywood.
I also made a box out of the wide boards of pallets that a compagny threw out in the garbage. Ad Shop farmhouse toy storage at Wayfair. Then glue and screw the sides to the front and back boards.
Now take your outside corner moulding and cut 4 pieces for each side of the lid with 45-degree mitered angles and attach with wood glue and a nail gun. Toy Box Plans From My Outdoor Plans. Woodworking maker toyboxIn this video I show how I make a high end toy box out of relatively cheap materials.
Lightweight DIY Toy Box. Place the grain running sideways then measure 3 in from the corners on the two sides at the entryexit points of the grain. Not all toy boxes should have a cover.
1 4 x 8 ft 025 inch sanded plywood. On either side of the vertical cross mark another cross at 16mm distance. Lay out the Parts.
Photo by Wendell T. A list of all the tools supplies and lumber that you need are listed off to the side. This helps clean up the edges and makes it.
Cut a 45-degree angle on one side. Measure the length of the plywood according to the size of your toy box. Measure the width of the plywood according to the size of your toy box.
Lightly sand the plywood edges with 120-grit sandpaper before assembling. Ad Read Customer Reviews Find Best Sellers. We carry all things home for every room.
Jan 19 2015 - This step by step diy woodworking project is about how to build a toy box. Here is what you need for this toy box. 4- 1 inch brackets.
Use the two 1x2s 36 and two 1x2s 14 around the 14 x 33 plywood board. Unfinished Crate Wood Toy Box. 2 - Cut on a 45 degree and leave a little extra to allow for the saw blade.
This allows you to use a flathead screwdriver to raise or lower the toy box to make it level. Buy farmhouse toy storage at Wayfair - We carry all type size and more. Now its time to build the DIY toy box lid.
For the lid of the toy box you want to take your 12 plywood and cut it to 40 12 x 16 12. This plan from Chiefs Shop can be used as a toy box for kids or as a storage chest for someone of any age. This toy box plan makes use of a few wooden beams but you can also recycle old wood if you have one at home.
Because that is what i had on hand. 1 4 x 4 ft 050 inch sanded plywood. If desired before attaching front panel use a jig saw to cut out a slot to help prevent.
Install the single 1- x 3- x 24 12-inch board to the back between the corners and 38-inch higher than the top edge. 2- 1 x 1 inch 8ft boards. Placing a square level right underneath you want to make a horizontal line next.

How To Make A Wooden Toy Box Home Comfort And Love Wooden Toy Boxes Wood Toy Box Diy Toy Box

Woodworking Plans Plans To Build A Toy Box Free Download Plans To Build A Toy Bo Woodworking Projects That Sell Easy Woodworking Projects Woodworking Plans Diy

Image Result For Diy Litter Box Crate Plywood Chests Diy Toy Box Plans Diy Toy Box Plans

Pin On Bench

How To Make A Wooden Toy Box Home Comfort And Love Wood Toy Box Wooden Toy Boxes Diy Toy Box
Toy Box Bookshelf Plans Google Search Bookshelves Diy Wooden Toy Boxes Toy Box Plans

Diy Storage Chest How To Build In 5 Easy Steps Building Plans Diy Storage Bench Chests Diy Diy Storage
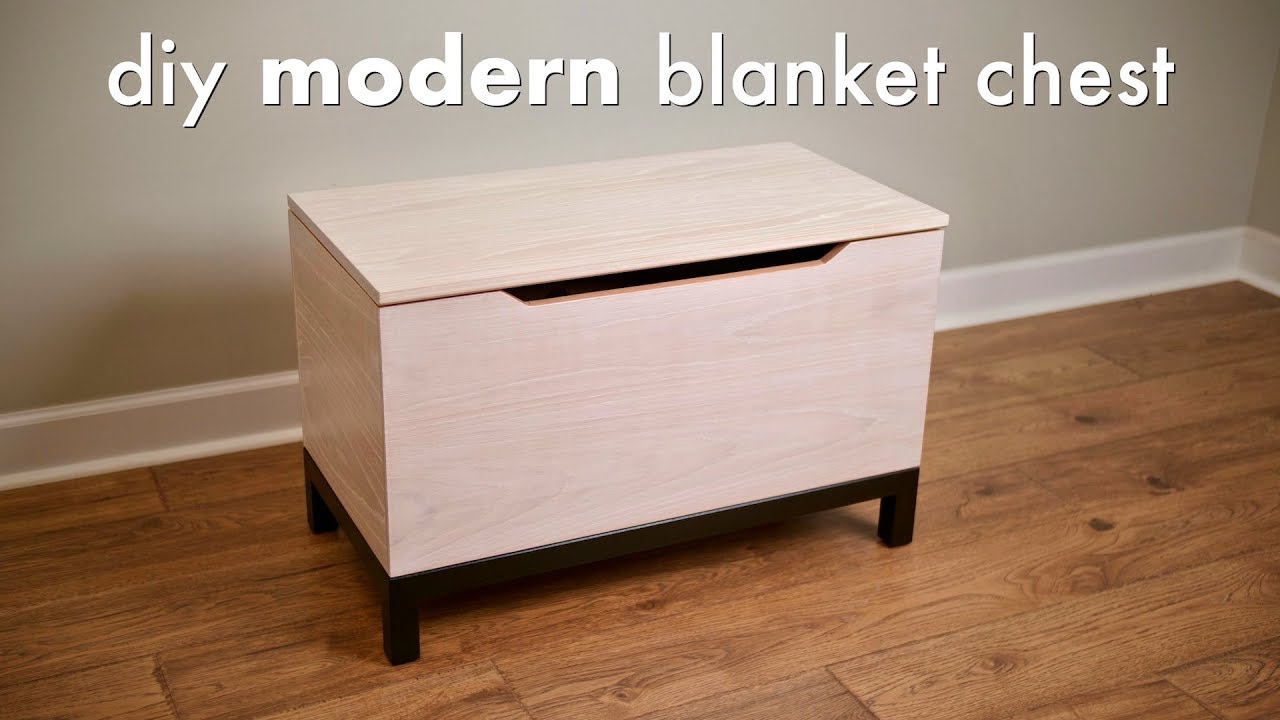
18 Diy Modern Blanket Chest Or Toy Box How To Build Woodworking Youtube Woodworking Diy Furniture Modern Blankets Chests Diy

Simple Crate Toy Box Diy Wood Box Diy Toy Storage Wooden Toy Boxes

How To Build A Toy Box Howtospecialist How To Build Step By Step Diy Plans Diy Toy Box Plans Woodworking Toys Diy Toy Box

Image 4 Gif 450 344 Pixels Wooden Furniture Plans Toy Box Plans Wood Toy Box

How To Make A Lightweight Wooden Toy Box Wooden Box Diy Diy Toy Storage Wooden Toy Boxes

Diy Storage Chest How To Build In 5 Easy Steps Building Plans Diy Toy Storage Diy Toy Box Toy Box Plans

Pin On Kids

The Burton Workshop Diy Wood Plans Woodworking Plans Toys Wooden Toys Plans

Toy Box Plans General Woodworking Talk Derevyannye Yashiki Dlya Igrushek Rabota S Derevom Yashiki Dlya Igrushek

Pin On Craft Ideas

Diy Toy Box Diy Toy Box Diy Toy Storage Playroom Seating

How To Build A Simple Toy Box With A Lid Including The Hardware I Used To Avoid Pinching Those Little Fingers Diy Storage Bench Kids Toy Boxes Wood Toy Box